Hey y’all. This is K. You’re about to read the full account of the engine repair. If you have been following along, you know that the engine has been up and running for several months now. I know that you’ve been eagerly awaiting all of the details and wondering what the heck is taking so long. Well, it’s taken me all this time to get C to agree to writing about the whole thing. It was a traumatizing ordeal. Like Prozac prescription traumatizing. (Still waiting on someone to write us that prescription!) Or in a way that makes you question all of your life choices. Mostly the choice to buy a 40 year old boat, but also smaller decisions like getting out of bed in the morning. But the engine is working, we’ve taken some trips, and time heals all wounds. Or just makes you forget about them. Or you’re just distracted by new projects. Either way, let’s all give C a virtual pat on the back for reliving this nightmare.
Hi. My name is Craig, and I am a project-aholic.
(Hi, Craig.)
I know I have a problem but the list just won’t get any shorter!
It all started one fateful October day. Boat people are known for having a this-guy and a that-guy. Remember Dave the Head Guy? After asking around the dock for suggestions, we contacted Dave the Engine Guy (different person, different specialty, same name) and he agreed to help us learn our engine if we agreed to pay him. He drove a hard bargain! So we made plans to start somewhere simple: how to change the fluids and belts. This sounded like a task that could be conquered in a day and Dave the Engine Guy assured us that it usually is a quick job.
Dave came over on the Friday before we were supposed to meet up with dock neighbors for a weekend raft-up. We expressed some anxiety about being able to make it for the weekend since all of our other projects seemed to turn into nightmares unexpected adventures. “No sweat. An oil and belt change doesn’t take long at all. Your boat will be good to go for the weekend,” our neighbors on the dock assured us. “We do that stuff all the time – no problemo!” Those assholes jinxed us.
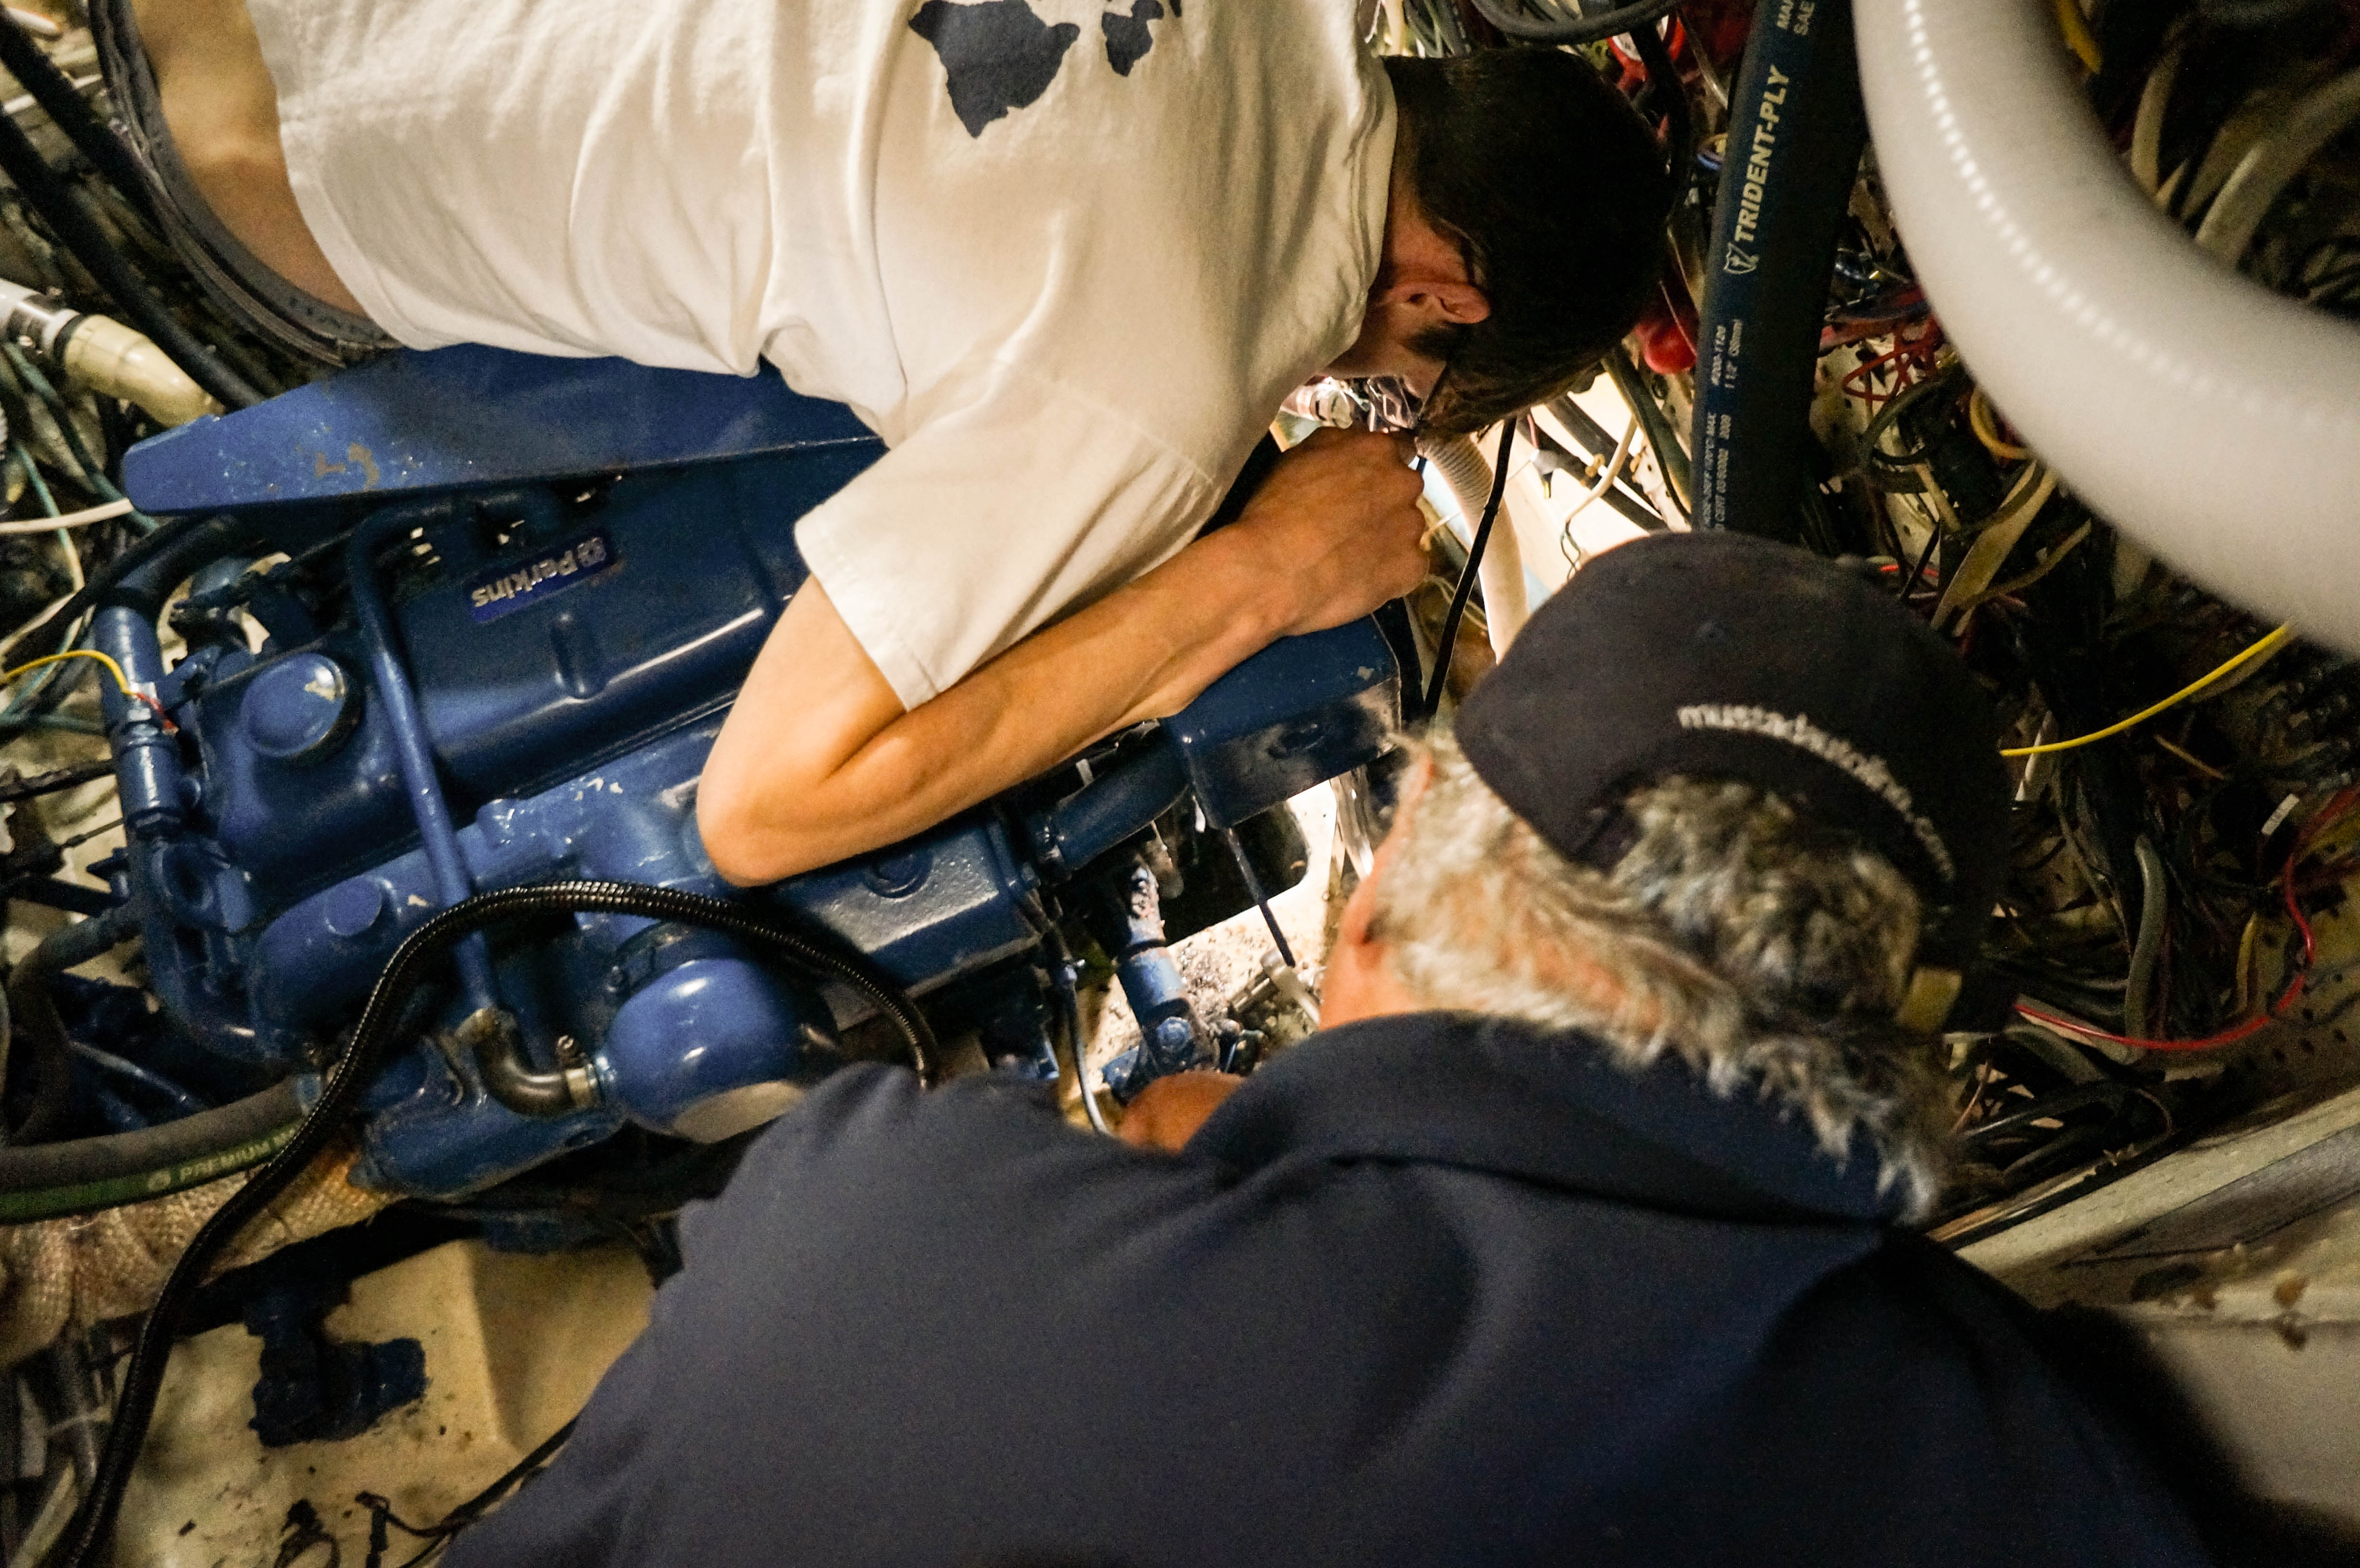
So there we were. Hunched over in the engine room beginning the tasks we’d set out to do. Time out. Shout out to Dave for even making it into the engine room. The man has a serious amount of arthritis in his knees. The poor guy was probably in terrible pain but he was always in good spirits. He gets a gold star in my book. Time in. We drained and replaced the coolant- Success! We drained and replaced the oil- Booya! (This is riiiight about when I started feeling cocky about finishing being in ship-shape for the weekend.) We started to take off the old belt and then it happened- #alternatormountfail. (Krystle made me hashtag. I’m not that good at it. #nogoodathashtagging.)
The belt connects to a couple pulley wheels on the front of the engine and then wraps around the wheel on the alternator. As we adjusted the alternator to remove the old belt we realized that things were all loosey-goosey-like. Things were wibble-wobbling when they should have been glidy-widing. (These are technical terms that we’ve picked up along the way. Use them with your mechanic- they’ll love it!)
Here’s the thingy-thangy. Ahem… Here’s the thing. The engine had two alternators mounted on the side of it. One of them was huge and the other one was not as huge. Both of them were heavy, old, and inefficient. There should only have been one alternator mounted on the engine because that’s what the engineers at Perkins designed the engine to hold. Because that’s what their big dollars in research & development had concluded. Because there is a time and a place for MacGyver and apparently this was not where he should have been “improvising”.
I know what you’re thinking. “So all the weight and associated torque from the two alternators led to that wibble-wobble that should have been a glidy-widy“. Exactly. I could tell that you’re a smart cookie.
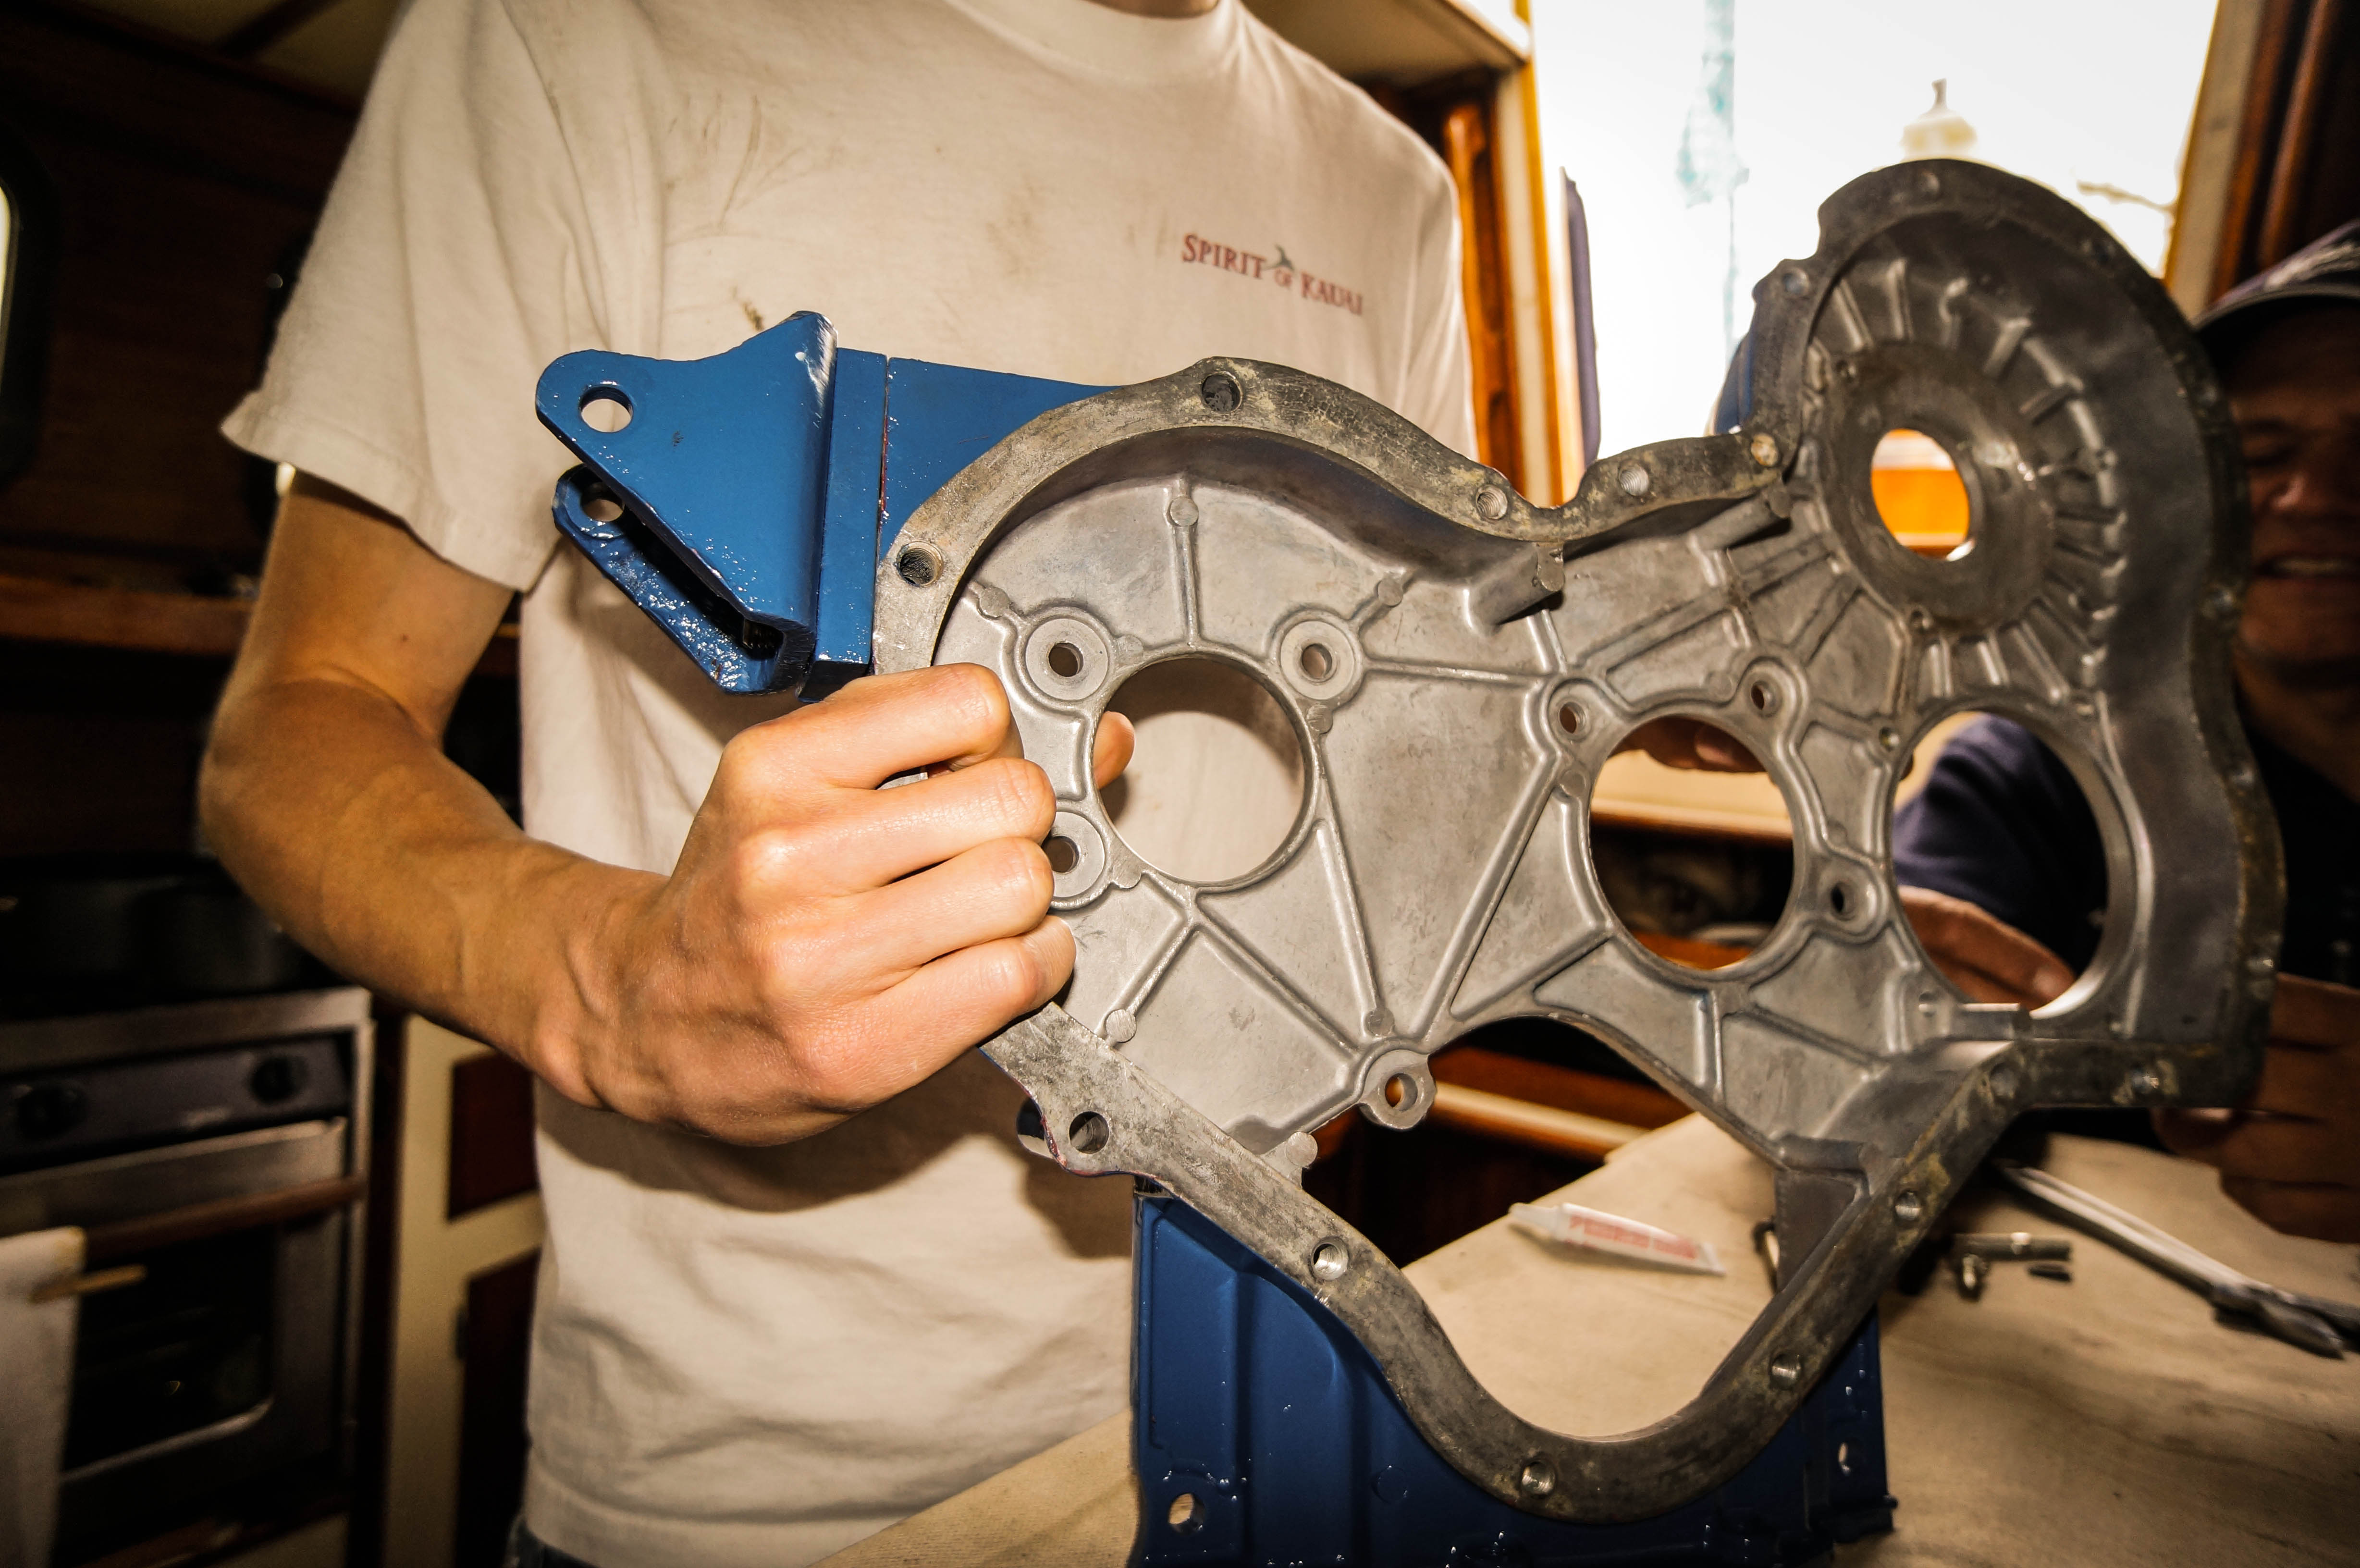
You see, both alternators were hanging off the engine on the original Perkins bracket which was only designed to hold one (much smaller) alternator. Overtime the two studs that held the bracket on the side of the engine decided that life would be easier for them if they were no longer associated with the whole situation. When Dave the Engine Guy and I entered the scene, the top stud had since vacated its proper positioning. Well not so much vacated it. It was still there. But it was split into two very unhelpful pieces.
For you math inclined folks out there, this is the problem we are dealing with:
2 studs – 1 stud = X months of agony
And X = 8

See how that bottom hole is nice and hollow? See how that top one isn’t? That’s the problem.
The top stud had in fact broken off inside the threaded hole that was supposed to serve as its trusty home. We also discovered that this same issue must have happened in the past because the top stud had been previously helicoiled. Why I was surprised, I’m not sure. Helicoil is a brilliant invention that allows a threaded out screw hole to be “renewed”. It’s like plastic surgery for a screw hole. The helicoil has a tendency to hold on tightly to the screw. So when the stud remnants were not easily removed from the hole, Dave the Engine Guy gave his parting words. I think they were along the lines of, “let me know when you get the bracket situation figured out.” Sure hope he didn’t hold his breath!!
For the next few months we had dozens of conversations with many different people on how best to repair our issue. Everyone seemed to have some great ideas and we partially committed to each of them… because we have no idea what we are doing.
Behold. The List of Plans.
Plan A- Remove the old stud. With the help of a centering punch I attempted to drill out the old stud that was stuck in the hole. Nope.
Plan B- Make a new alternator bracket. Arts and crafts, sparks and steel! With a silicon mold kit purchased from an art store I made a mold of the section of the engine where the alternators were mounted. Next step was to fill the mold with plaster of Paris. (Just call me Marty Stewart.) Then Krystle took that plaster mold, which served as an exact duplicate of the surfaces of the engine, to our neighbor’s shop. Caleb has been working with metal for a long time and he knows a thing or two. K and Caleb attempted to make a new steel attachment point for the alternators, but metal isn’t very forgiving and the nooks and crannies of the engine were numerous. In the end the fabricated piece of metal wasn’t perfect and therefore it was out the window. Shooting sparks all over Caleb’s shop made for great photos, but we concluded that adding an additional piece of metal to vibrate and potentially chafe through the gear casing was less than ideal.

The start and end of C’s art career – creating a silicone mold of the engine.

You should’ve seen Craig. He was just so proud.

This is when Craig was still optimistic about Plan B. What a chump.

Caleb joins the craft train and helps create a mounting bracket.
Plan C- Mount the alternator off the engine. We’d heard about an alternator mounting bracket that could be installed off the engine and through-bolted to the boat. I tried to find this product with limited success. Although this idea was enticing we eventually circled back around to a desire to hold true to the design that Perkins had engineered.
At this point we were several months into the fiasco. Bored/overwhelmed/defeated with the alternator project I had moved on to completing other tasks. While visiting Small World in the Caribbean I learned that the raw water pump was leaking. These things tend to happen as seals and bearings get tired and give up, so I wasn’t overly concerned. Luckily there are rebuild kits readily available for engine raw water pumps. At least that is what I had been led to believe.
It was a goddamn wild goose chase trying to track down what we needed. In one day I went to four (or was it five?) marine supply stores looking for the necessary parts. Each time I walked in, pump in hand, the employee behind the counter would greet me with a similar comment about how they were certain they supplied the rebuild kit. But nooooooo. They we’re all a bunch of liars. No one carried it, no one could order it, and no one had a solution. Eventually I found the rebuild kit online at some obscurely named place like Pumps-R-Us. For obvious reasons we went ahead and bought two rebuild kits.

No. That’s not poop. It’s rust on the raw water intake pump.
Getting the old pump apart was a tertiary project to the secondary project (rebuilding the raw water pump) to the primary project (getting the engine running again). The solution to all of these problems was Ed.
Ed, yet another helpful neighbor, is a Chief Engineer on a big, commercial Alaskan fishing boat (think “Deadliest Catch”). The guy spends months at a time in the Bering Sea making shit work on a boat that is more like a floating factory than your proverbial rusty lobster loabstah boat from New England. We took a tour of one of the fleet’s newer ships and good lord it is nothing short of a death machine. The poor, oblivious fish goes from being a peaceful ocean swimmer to a piece of meat frozen in the giant vaults of the bowels of the boat in a matter of minutes. It’s a terrifyingly efficient process. And Ed has to make sure it all works. We kind of love and hate him for this reason.
At any rate Ed fashioned a new tool for us- a bearing press(!)- that will forever be a part of the tool inventory aboard Small World. (We will be the envy of all of the cruisers and shall trade beer and/or ice cream for tool usage.) This bearing press allowed us to easily disassemble the pump (which otherwise would be nearly impossible) and Ed coached me through the rebuild process. This side project had its share of complications but it led to us building a relationship with Ed. And as you are about to learn, Ed saved the day.
Meanwhile, back at the ranch in the engine room!
Plan D- Torch it! At this point we’d been several months into the debacle and I was thinking about how to collect on the insurance money. Late one night we decided to just torch the boat. (Disclaimer to our insurer: Just kidding!!) We did decide to torch the engine though. Sort of.
Another awesome neighbor of ours (hot damn are we lucky) made a living as a welder. He was selling his business in the spring, finishing various boat projects, and by early summer was going to be sailing off with his wife to destinations unknown. Jeff had agreed to attempt to weld a new stud onto the engine. But not until he’d sold the business in May. So we patiently waiting, filling the time with plenty of other projects until May rolled around. It was a huge rush to watch a bright blue flame come roaring out of a metal stick as I held my finger (gloved in leather) ½” away and applied as much of a steady hand on the end of a stud as possible. Despite my quivering finger brute strength and bravery, and Jeff’s blow-torching expertise…this plan also failed.
Plan E – Replace the engine. For a hot second we considered replacing the whole damn thing. Then we realized how much time, effort, and money that would take. Get real! The engine itself was fine, so replacing the whole thing just for the alternator mount just seemed a bit over the top.
Plan F- Sell the boat. Sometimes I just get really overwhelmed and frustrated by it all and consider putting the beautiful blue bastard up for sale. But trying to sell a boat without a functioning engine would not be easy. And selling it without your wife finding out would be even harder. My ninja skills are aplenty, but K’s spent a lifetime watching detective shows. Thanks a lot “Murder She Wrote”!
Plan G – The Holy Grail. Plan G involved isolating the piece of the engine that held the studs so that it could be welded and machined to like-new. I think we knew it was going to come to this solution months before we went forward with it. But the thought was too daunting. This plan involved removing the entire front of the engine- the front timing cover, all the timing gears, and the rear timing cover. If you’ll recall, we have no idea what we are doing and diesel engines don’t just tell you how to repair themselves. This is where Ed re-enters the story. He actually agreed to help us do this. That man has some seriously good Karma headed his way.
Hours of boat yoga ensued. Child’s Pose on the battery box. Downward Dog off the engine. We even invented a few new ones: Crouching Tiger Hidden Dragon, Complete Pretzel, and Greasy Sailor. After several hours of work we victoriously held the piece of the engine over our heads and yelled like a couple of Neanderthals. Actually that was just my reaction. Ed does this shit for a living and just stood there staring at me making a fool of myself.
Craig and Ed (t)working on the engine.
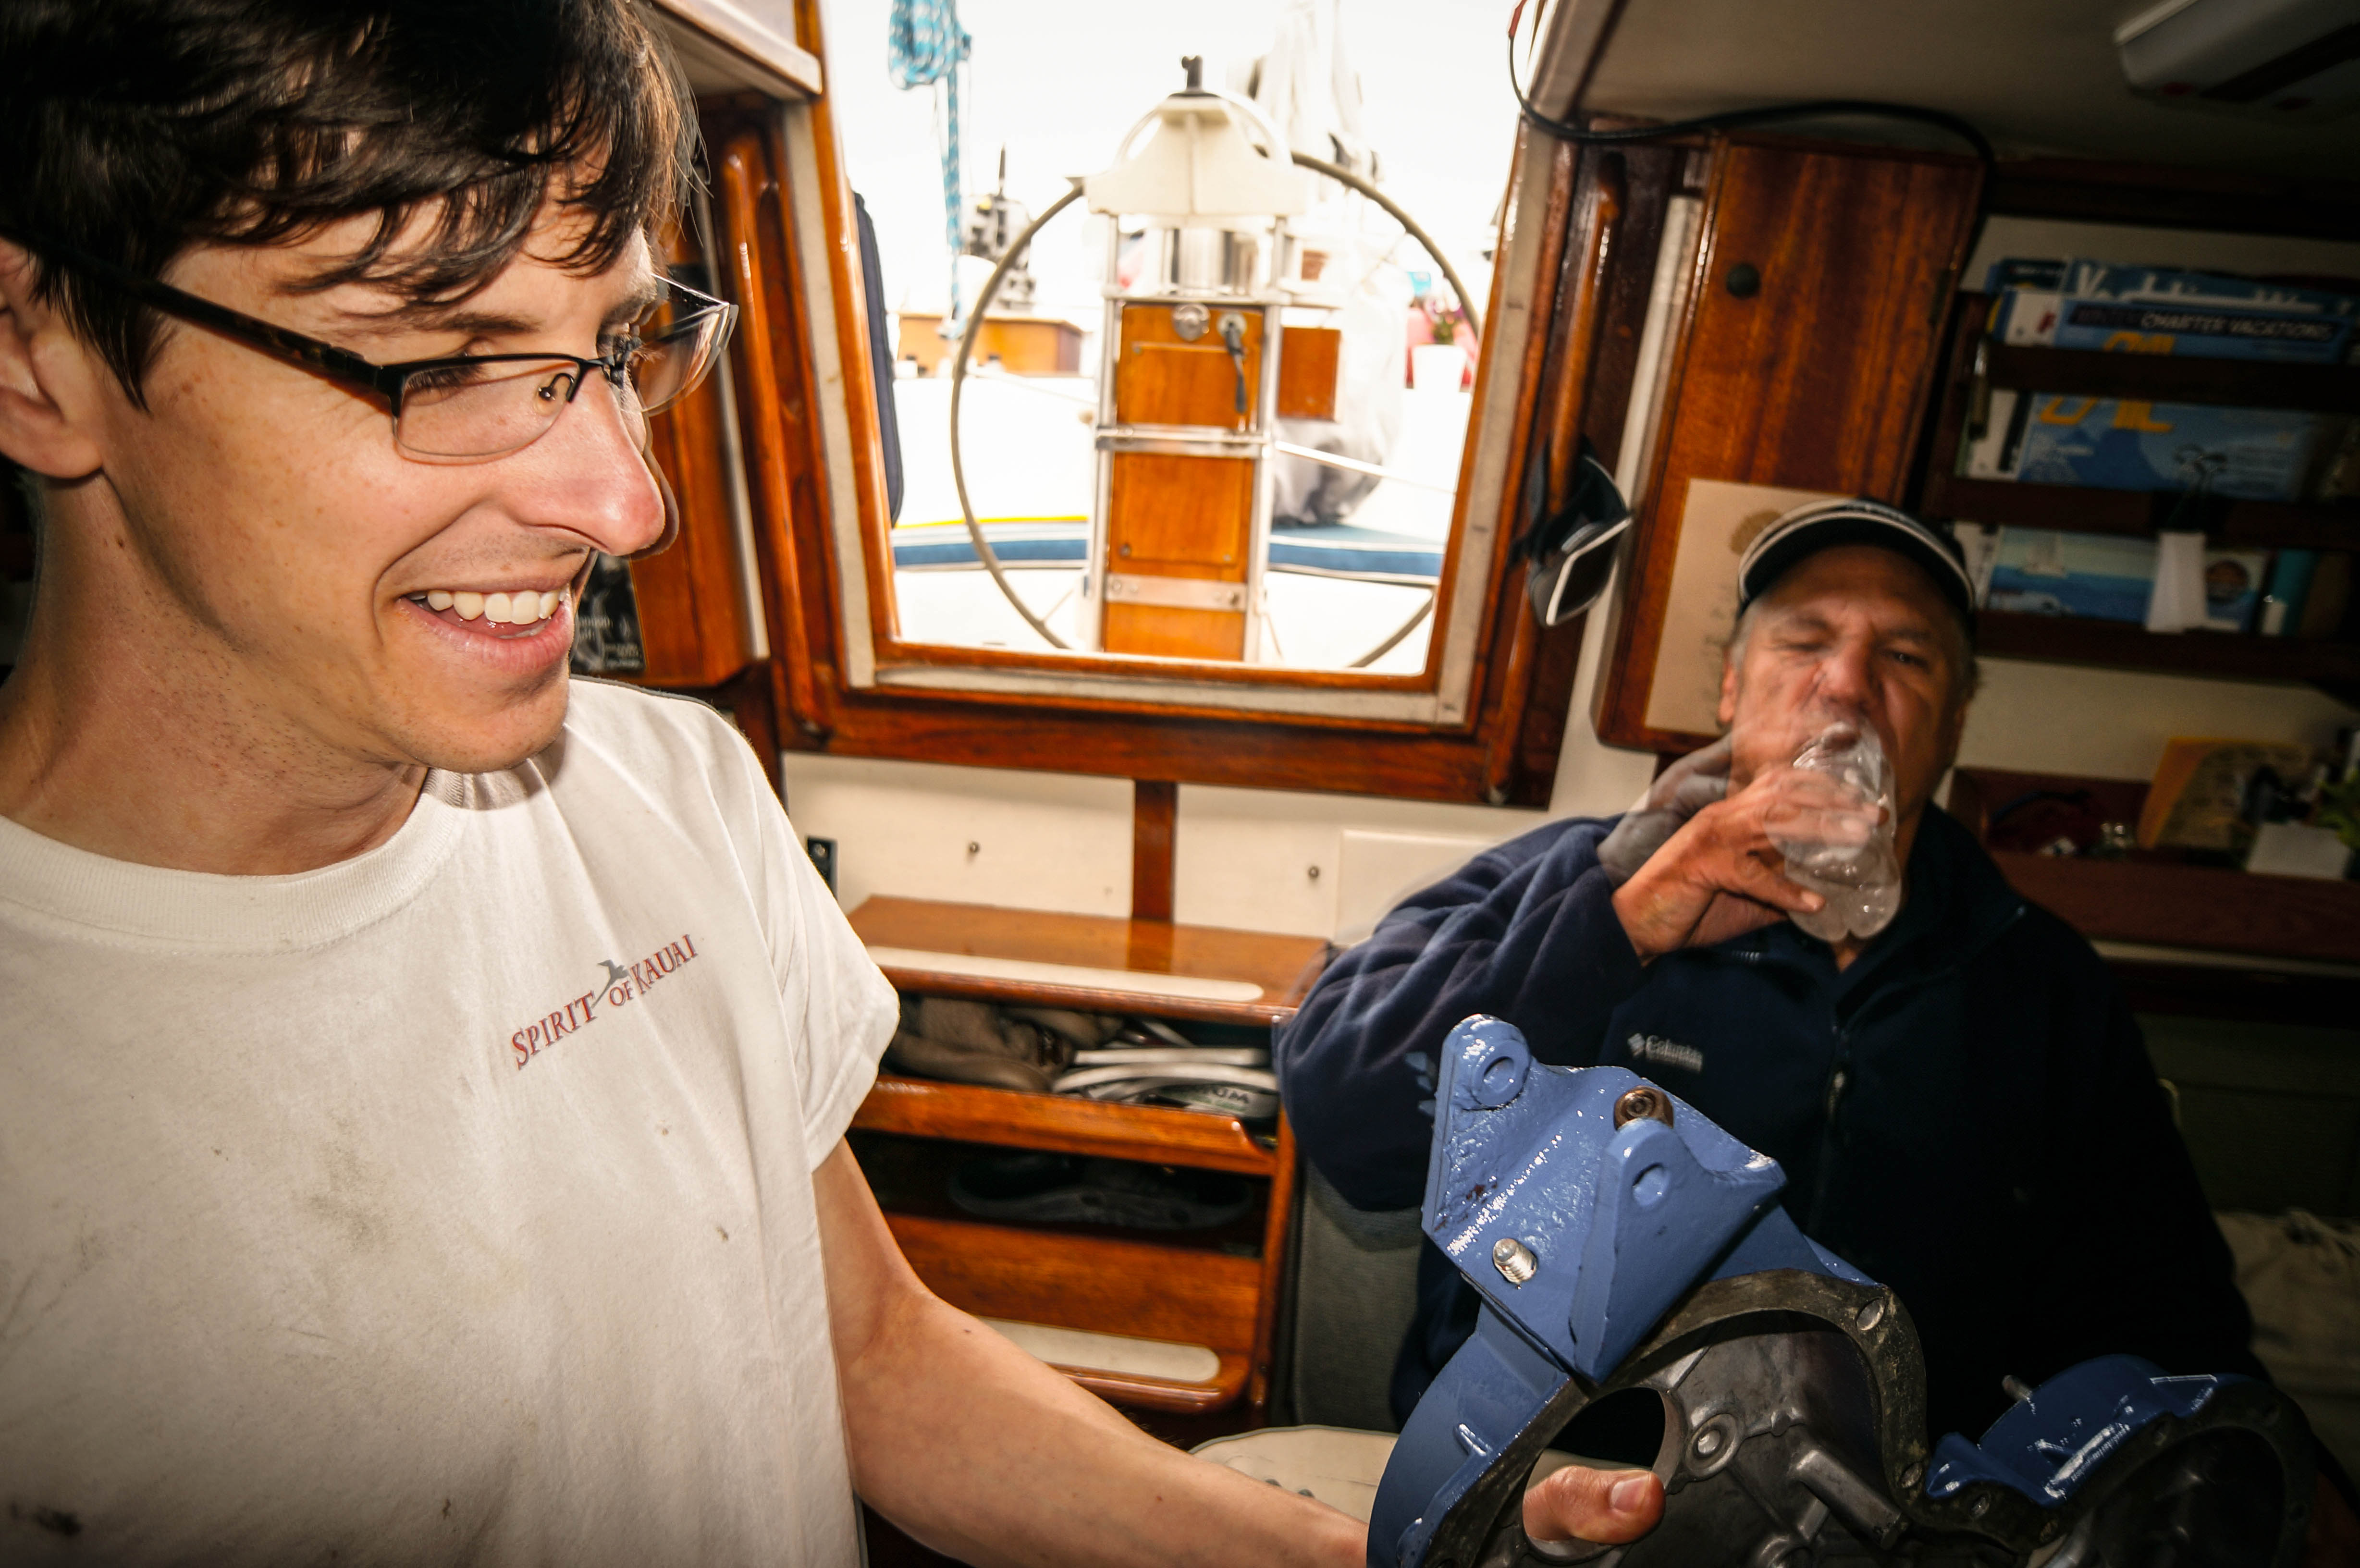
This glorious piece of cast iron was delivered to a machine shop that was recommended to us by another wonderful neighbor (we’re surrounded). A few weeks later we happily received the beautifully reconstructed alternator mounting surface. I took it home, painted it to match the Perkins blue paint job on the rest of the engine, and went back to boat yoga with Ed. Over the course of several days we made new gaskets for all the pieces that we had removed, reinstalled the timing gears, screwed everything back together, bled the fuel line, and held our breath as we turned the key for the first time in 8 months. I never would have tackled any of this without Ed by my side.

Playing with the guts of our engine would have been nerve wracking without Ed.
Isn’t it gorgeous? I never thought I would say that about cast iron.
And we never would have felt the joy of hearing that engine start up again. Or the feeling of satisfaction knowing that the end result had been influenced by our commitment to be involved and to do things right. This is sweet, sweet, vindication for getting a boat that needed a little love. As we sail off into the sunset, I’ll have a bit more confidence in my ability to trouble shoot engine issues that arise. 1 point for me!
I’m so excited I’m shaking! It’s all coming together!
Is anyone still reading this? If so, you’re either a sailor or you really love us. This was a long one. Give yourself a pat on the back (or glass of wine if that’s your thing) for making it this far!
Can you believe that the story isn’t over yet? Neither could we.
We didn’t feel that either of the alternators that were installed on Small World when we bought her were the ones that we wanted on the boat when we were offshore and far, far away from the nearest harbor. So we did a lot of research and ultimately decided on a new 100-amp Balmar alternator. This was close to the amperage of the alternator that the Perkins folks had designed the engine to hold. And more importantly it meant we could keep a single-belt configuration off the engine.
So I took the old alternators to a shop down the street from the marina to figure out what to do with them. This place was recommended by a neighbor as “a shop that does good work”. If that hadn’t been said to me I probably would have walked away before I ever walked in. The store front is covered in political stuff. The office front is “decorated” with photos and news articles damning this politician and raising up another. It all felt a little uncomfortable and I was glad that K wasn’t there. She has a hard time keeping her mouth shut on occasion. (Don’t tell her I said that.) But they looked over the old alternators and came back with a verdict. One of the alternators was too old to even service. “You could sell it as scrap for about 5 bucks” was the advice I was given when I asked what to do with it. The other alternator was old, but could function as a spare. So we had them clean it up and make sure it was in working order. Into the spare parts inventory it went. The new alternator was mounted and wired, and we went on a weeklong sail trip, and life was good.
Cheers to all the folks that helped us along the way with this project. We literally couldn’t have done it without you.

Thankfully, we were spared the Perkins adventure on our WS42, Harmony! By the time we got the old girl, the Perkins had “blown up” and was removed leaving various viscera and fluids all around the engine room. We repowered with a Yanmar 110 hp. Total actual install time was 8 weeks, with new shaft, cutlass bearing, and exhaust thrown in as a bonus. The engine works great. Heck with the 110 hp, I can almost get the boat to hydroplane on the bottom of the keel! OK, it felt like that at almost 8 knots, but I can at least wakeboard behind her almost. Fair Winds and Following Seas!
LikeLike
110?! Wow! That would get you going pretty quick, wouldn’t it? I think we are at 85hp and other than this mounting bracket, the engine has been great for us so far (yes I knocked on wood). Purrs like a lion whenever we ask her to!
LikeLike
Yes, she moves our smartly. However, we can cruise at a comfortable speed at conservative rpms leaving enough reserve for currents, tides, and a rare opportunity to visit a different galaxy! We’re glad you are making progress! The smiles on the video when your engine turned over were fabulous!
LikeLike
Sounds sooooo familiar! My Volvo MD3B chugged and plugged for almost ten years before succumbing to a mechanic’s incompetence. Repowered with a Yanmar 30. Total time was about two months (never tell a mechanic “I’m in no hurry,” thinking you’ll 1) save money, or 2) get better quality work.) The two most striking observations were how quiet Yanni is compared to the Volvo, and the lack of exhaust fumes in the salon! Enjoy the ride, kids – happy stories are forgotten almost immediately; the painful ones are told over and over and over…
LikeLike
Perkins sagas. Yeah I got a few myself with a 4.108 48hp. Pulled it and replaced the gaskets ( a liter of oil would spew out every couple of hours). Then the raw water pump leaked, fixed it, then its coupler broke and untrimmed the fuel pump. Fixed it. Then the coupler came loose/unpressed, fixed it. And now the tranny has a hole mixing raw water into the oil. Wont this ever end?? Thinking re-powering but the engine itself runs like a top! Whats up with that?? Of course I’ve got my main dude named Kostas. Otherwise I would have…….. . And all this within 2 years. At least I’ve gotten the hang of grabbing my mooring under sail! Jeeeez!
LikeLike
dear kraigle ~ yes, i read the whole post — color me “salty” or more accurately, someone who loves you! since your schedule allows for no regular work-outs these days, it’s good to know that you have been practicing boat yoga – ha! seriously, congratulations on repairing the engine [note to yourselves: never try this away from home] and thank you for “reliving the nightmare” for your reading public!
LikeLike
Terrific blog, terrific story. What was the electrical problem that wouldn’t let her start? What did you change to get her going?
LikeLike
Hi! Thanks for reading the blog. Glad you enjoyed it! And thanks for your question.
Short Answer: A do-dad that needed to be flopped had been flipped.
Long answer: There is a battery selector switch that is located in front of the engine that is actually being used as a positive buss bar. When we wired up the new alternator that switch had been turned (Intentially? I honestly don’t remember.) So in the beginning of the video when we were trying to start the engine we were asking the batteries to do their thing without a complete circuit. When Ed and I were talking about if the issue was something having to do with the real battery selector switch I remembered/realized that the fake battery switch had been turned. So I turned the fake battery selector switch, which is actually a positive bus bar, to allow the circuit to complete and that’s when we all heard the sweet, sweet sound of the diesel!
LikeLike
Gotcha. We just picked up a 36 with a Westerbeke/Perkins 40, and in the brief couple of hours when I went to start it (and look over a bajillion other things), I had a similar result – a click like the solenoid partially engaging, and then nothing. I’m assuming that there’s not enough juice in the battery, but the selector is a good thought, too. I need to learn the system. Just waiting for warmth. Best of luck you guys. Love reading your stuff.
LikeLike